Showing posts with label Sewing. Show all posts

Thursday, July 19, 2012

Sneak Peek...

It might seem like our blog has been a bit idle lately 
but it's all for good reasons!
My hands have been busy busy busy!!
Here's a little taste of what has been keeping me busy - aside from our family vacation to COLORADO SPRINGS & the regular friend & family fun that we CAN'T STOP having!


My friend asked me to make some things for her baby girl's nursery! I was so excited to jump back into sewing & also help my friend create her (2nd) dream nursery! She told me what she wanted & I went to work! 
 Now it's TWO weeks till 'it's time!'  There's more to be done, so this is just a sneak peek at what has been made sofar...


The gray, the pink, the ruffles, the bows, the damask print
It's all so beautiful & feminine.


...and I wanted to include the little inspiration for this nursery :)
Isn't she cute?!


More to come...

Love,
Julie

Thursday, September 1, 2011

The Ash-bag…A pretty purse for a pretty wonderful friend


IMG_5290 (480x640)

Me: Honey, what name should I give Ashley’s purse?
Andy: The ass-bag. WAIT, no I meant The Ash-bag. Or how about Bag of Ashes.
Me: (snort hahaha) Ohhh Never mind…you’re totally making this harder than it has to be.
Andy: That’s what she said.
(yep, that's my husband for ya...typical Office fanatic...)


IMG_5283 (480x640) 

IMG_5289 (480x640)

IMG_5294 (640x480)


I LOVE the girly fabrics. I’ll be sad when I run out of them.
The pattern was a total experiment that I whipped up. I wanted to make a purse for my friend Ashley for her 30th birthday. It had to be unique, practical & CUTE. So, I was fiddling around with shapes & ideas of how I wanted the strap to go & THIS is what I came up with!!
IMG_5281 (480x640) 
It took about 5 hours over a couple days. It totally shouldn’t have…My machine gave me some trouble…some child induced trouble.  Plus there were some re-runs of the The Office on TV the night I was cutting the fabric out so that was a little distracting.
After I was finally done it sat for a couple weeks…because I wanted to add something extra special to put inside it (see here what it was!) But since this was a gift, you’d think I’d work faster! I’m happy to report that my friend LOVES the bag & told me that I hit a grand slam Smile LOVE HER!

IMG_5288 (480x640)


What do you think of the Ash-bag?
Has anyone ever hand-made you a gift before?
 I want to hear about it!
I'm linking this beauty up at my favorite parties! Check them out here!

Wednesday, July 13, 2011

The 8-Step Ripped Rose Tutorial


Here's an 8 step tutorial for making a Ripped Rose.  One day Keston came to me at my sewing machine & asked to help me make "sumping." This idea just came to me...After making the Small Ruffled Tote & Tri-Tattered Flower, I knew ripping fabric was the way to go with Keston on my lap. And so this rose was the result. Give it a try & see what you think! These roses can easily be attached to a pin, a hair clip, headband, or anything really! They're quick to whip up too & can even be made with a 2 year old on your lap...    I promise!
Grab some cute scrap fabric & try this out!
Ready?
Okay, GO!

1st - Tear a strip of fabric that is 1.5 - 2" wide
 To do this, make a 2" mark on the selvedge edge of your fabric. Make a small snip there with scissors.
Start tearing!
I tore the entire 44" width of my fabric.
You may need to cut along the untorn edge to even out your strip.

*tip - If you want a smaller flower, I suggest tearing at 1.5" & then cutting along the untorn edge making it the width that you wish it to be & then tearing the length less.
  
2nd - Adjust the settings on your sewing machine
Set the tension to the highest setting.
Set your stitch length to 4.


3rd - Start stiching
Do not back stitch though! 
Using 1/2" seam allowence, stich down the entire length of your strip.
You'll notice that the fabric gathers on it's own.
Isn't that pretty already?

4th - Begin rolling up your gathered strip of fabric
As you roll be careful to keep your center low & pulled down a bit.
It can easily become higher than the rest of the flower, making it look awkward.
(it's okay if you have to re-roll it a few times before you get "the look" you want.)


5th - Shove a pin (or 2 or 3) through the base of your flower.
This will help keep it secure for step 6.

6th -  Hand stitch the bottom.
Stich until you feel like all the layers are secure.
7th - Cut out a fabric circle for the back.
You can use felt or another stiff material that won't ravel.
8th - Get out the hot glue gun.
Hot glue the fabric circle to your flower & then hot glue a pin into place.

Pretty as a posie!
If you could or will make a ripped rose, HOW will you wear it & WHAT will you wear it with? Or WHO will you make one for?

Sharing this post at these parties :)
The Girl CreativeSumo's Sweet StuffMaking
Keeping It Simple


 Somewhat Simple

A Little Knick KnackHookingupwithHoH

Friday, May 6, 2011

FLOWER POWER WEEK!! DAY 5 - Flaming Flowers TUTORIAL

Flower Power Week!
Day 5
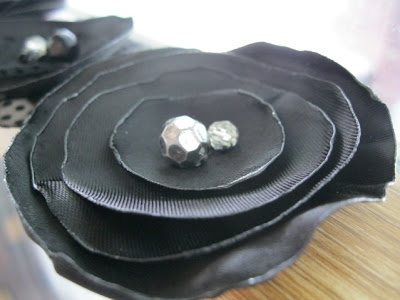
Flaming Flowers

These beauties are SO easy to make! The inspiration for them came from my friend Laura who made me a couple for my birthday this year.
She told me they were SO easy so I just had to see if she was right :)
I've been wanting to make a bib necklace for some time now so I experimented.

I didn't want it to look so much like a bib though...so I'm not sure if that's what you'd call this style of necklace. All I know is that I LOVE IT!
I can't wait to start wearing it.
You'll be seeing it on me soon for What I Wore Wednesday!


Here's the tutorial that I promised!

 Supplies for Flower:
Satin Fabric
Assorted Beads
Lighter
Scissors
Needle
Thread
........

Additional Supplies for Necklace:
Chain
Felt
Hot Glue Gun

 Start by cutting out multiple circles in 3-4 different sizes.
I used a template from a felt circle I already had on hand.
My largest circles were 4"
My smallest circles were 1.5"
The amount you need depends on how many layers you want your flower to have.
Mine all had 4 layers.

 Lightly graze the edges of your satin circles with the flame of your lighter.
Watch it melt...but don't catch it on fire!
(& make sure your 4 year old isn't around to watch! The last thing you need is a jr pyro-maniac in your house!)

 * I used some sheer polka-dot fabric on one of my flowers to change the look up a bit. This fabric didn't melt as easily as the satin. I had to be very careful because it caught on fire rather easily. If you use any sheer fabric do not let the flame touch the fabric. Be patient. It will slowly melt as you keep it close without touching.


 Now, layer your circles where you want them & pin them in place.
See how each circle looks different?
That's part of the beauty of it.
(Also see THIS bloggers way of cutting her circles...she snipped the edges before melting them. I kinda wish I would've tried that! It's so pretty & petally.)


Time to secure it & dress it up by adding the beads!

 Coming through the bottom, use your needle & thread to attach your beads in the center of your flower. Add as many as you want.

Wah-lah!
(so simple & so pretty!)


To make the necklace...


1. Cut out a piece of felt in the shape that you'll be arranging your flowers.
(if your felt is too flimsy for the weight of your flowers, you may want to double up & glue 2 strips of felt together...even add interfacing between them if necessary.)

2. Separate your chain in an appropriate place.

3. With hot-glue, glue the ends of your chain to the backs of your flowers.

4. Drop some hot glue on the center of your felt.

5. Lay your center flower on the glue.

6. Glue the other flowers onto the felt.

You've probably noticed that I added a black ribbon to my chain. The chain ($3/Wal Mart) wasn't nearly as long as I needed it to be. It would've been perfect for a child. So to make it longer I added the ribbon.

So there ya go!
That's it for Flower Power Week!
Wasn't it fun?! If any of you have other ideas for "themed" weeks, please let me know!

Check it out,
this is where I'm partying...
Photobucket
The Girl CreativeSumo Sweet Stuff
Keeping It Simplecraft

Printer Friendly View

Related Posts Plugin for WordPress, Blogger...