
Flower Power Week!
Day 5
Day 5
Flaming Flowers

These beauties are SO easy to make! The inspiration for them came from my friend Laura who made me a couple for my birthday this year.
She told me they were SO easy so I just had to see if she was right :)
I've been wanting to make a bib necklace for some time now so I experimented.
I didn't want it to look so much like a bib though...so I'm not sure if that's what you'd call this style of necklace. All I know is that I LOVE IT!
I can't wait to start wearing it.
You'll be seeing it on me soon for What I Wore Wednesday!

Here's the tutorial that I promised!

Supplies for Flower:
Satin Fabric
Assorted Beads
Lighter
Scissors
Needle
Thread
........
Additional Supplies for Necklace:
Chain
Felt
Hot Glue Gun

Start by cutting out multiple circles in 3-4 different sizes.
I used a template from a felt circle I already had on hand.
My largest circles were 4"
My smallest circles were 1.5"
The amount you need depends on how many layers you want your flower to have.
Mine all had 4 layers.


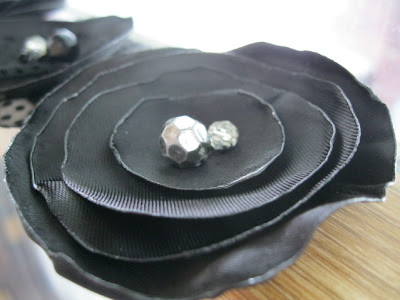
Lightly graze the edges of your satin circles with the flame of your lighter.
Watch it melt...but don't catch it on fire!
(& make sure your 4 year old isn't around to watch! The last thing you need is a jr pyro-maniac in your house!)

* I used some sheer polka-dot fabric on one of my flowers to change the look up a bit. This fabric didn't melt as easily as the satin. I had to be very careful because it caught on fire rather easily. If you use any sheer fabric do not let the flame touch the fabric. Be patient. It will slowly melt as you keep it close without touching.


Now, layer your circles where you want them & pin them in place.
See how each circle looks different?
That's part of the beauty of it.
That's part of the beauty of it.
(Also see THIS bloggers way of cutting her circles...she snipped the edges before melting them. I kinda wish I would've tried that! It's so pretty & petally.)
Time to secure it & dress it up by adding the beads!


Coming through the bottom, use your needle & thread to attach your beads in the center of your flower. Add as many as you want.
Wah-lah!
(so simple & so pretty!)


To make the necklace...


1. Cut out a piece of felt in the shape that you'll be arranging your flowers.
(if your felt is too flimsy for the weight of your flowers, you may want to double up & glue 2 strips of felt together...even add interfacing between them if necessary.)
2. Separate your chain in an appropriate place.
3. With hot-glue, glue the ends of your chain to the backs of your flowers.

4. Drop some hot glue on the center of your felt.

5. Lay your center flower on the glue.

6. Glue the other flowers onto the felt.

You've probably noticed that I added a black ribbon to my chain. The chain ($3/Wal Mart) wasn't nearly as long as I needed it to be. It would've been perfect for a child. So to make it longer I added the ribbon.
So there ya go!
That's it for Flower Power Week!
Wasn't it fun?! If any of you have other ideas for "themed" weeks, please let me know!
Check it out,
this is where I'm partying...


It‘s so nice that I found your blog about your link at 'i heart nap time'. Of course I’ve scrolled a little and like what I see. Now I’m your new follower! ;)
ReplyDeleteTake care
Tine
I love it!! Thank you so much the flower week Julie. My mom just gave me some fabric and I can't wait to create a few new things.
ReplyDeleteThat is adorable!! I have been wanting to make those flowers for some time now!! :) popped in from Skip to my Lou
ReplyDeleteSO pretty! Love the way it came out! I am visiting from The Girl Creative and I am your newest follower!
ReplyDeleteHave a great day!
Michelle
www.delicateconstruction.blogspot.com