Showing posts with label Crafting. Show all posts

Sunday, October 28, 2012

Furniture Stencil with Lace

Since I've had so much success (& fun) using lace curtains for marker boards & trivets... I thought I'd give it a try on furniture!  (Stay tuned for more makeovers with this technique).  


I found this little dresser on a Garage Sale Site (I wish a had a before, it was yellowish green and just crying to be pretty again).  It had already been painted so that saved me time priming. 

Step 1 - Clean with a de-greaser (to get off all the crud that accumulates).

Step 2 - I painted the drawer faces a metallic silver (after I removed the existing hardware).

Step 3 - I painted the body of the dresser with Rustoleum Black Gloss Enamel.


Step 4 - I laid all 5 drawers faces up side by side (touching so the paint would not cover the edges.

Step 5 - I used a valance I picked up at a Garage Sale for $2 and laid it over the drawer faces.  I secured it with painters tape, pulling tight to avoid bleeding.


Step 6 - I used Rustoleum Black Gloss Enamel and lightly sprayed 2 coats (back to back) over the entire surface.


Step 7 - I carefully removed the tape trying not to shift the lace.  Then I pulled back the lace carefully.  


Step 8 - After the drawers dried completely I put the dresser back together.


Step 9 - This had to be the toughest part of this makeover... Hardware.  It came with hardware but I wanted something glass and fun... I ended up buying glass hardware and hating the look.. Finally I took the original hardware spray painted it black to match the dresser and.... TA DA!!


I just love how it turned out!!  (Now if I use a valance again - see the lighter 'strip' that's where a rod would have went... I would have measured and made sure it didn't end up crooked..).


I love how it looks with my Thrift Store Mirror & Sconces (now necklace hangers).

Stay tuned for this Lace Makeover next...


Thanks for dropping by!
Feel free to visit us on Facebook too!

Love,
Michelle & Julie

Sunday, October 7, 2012

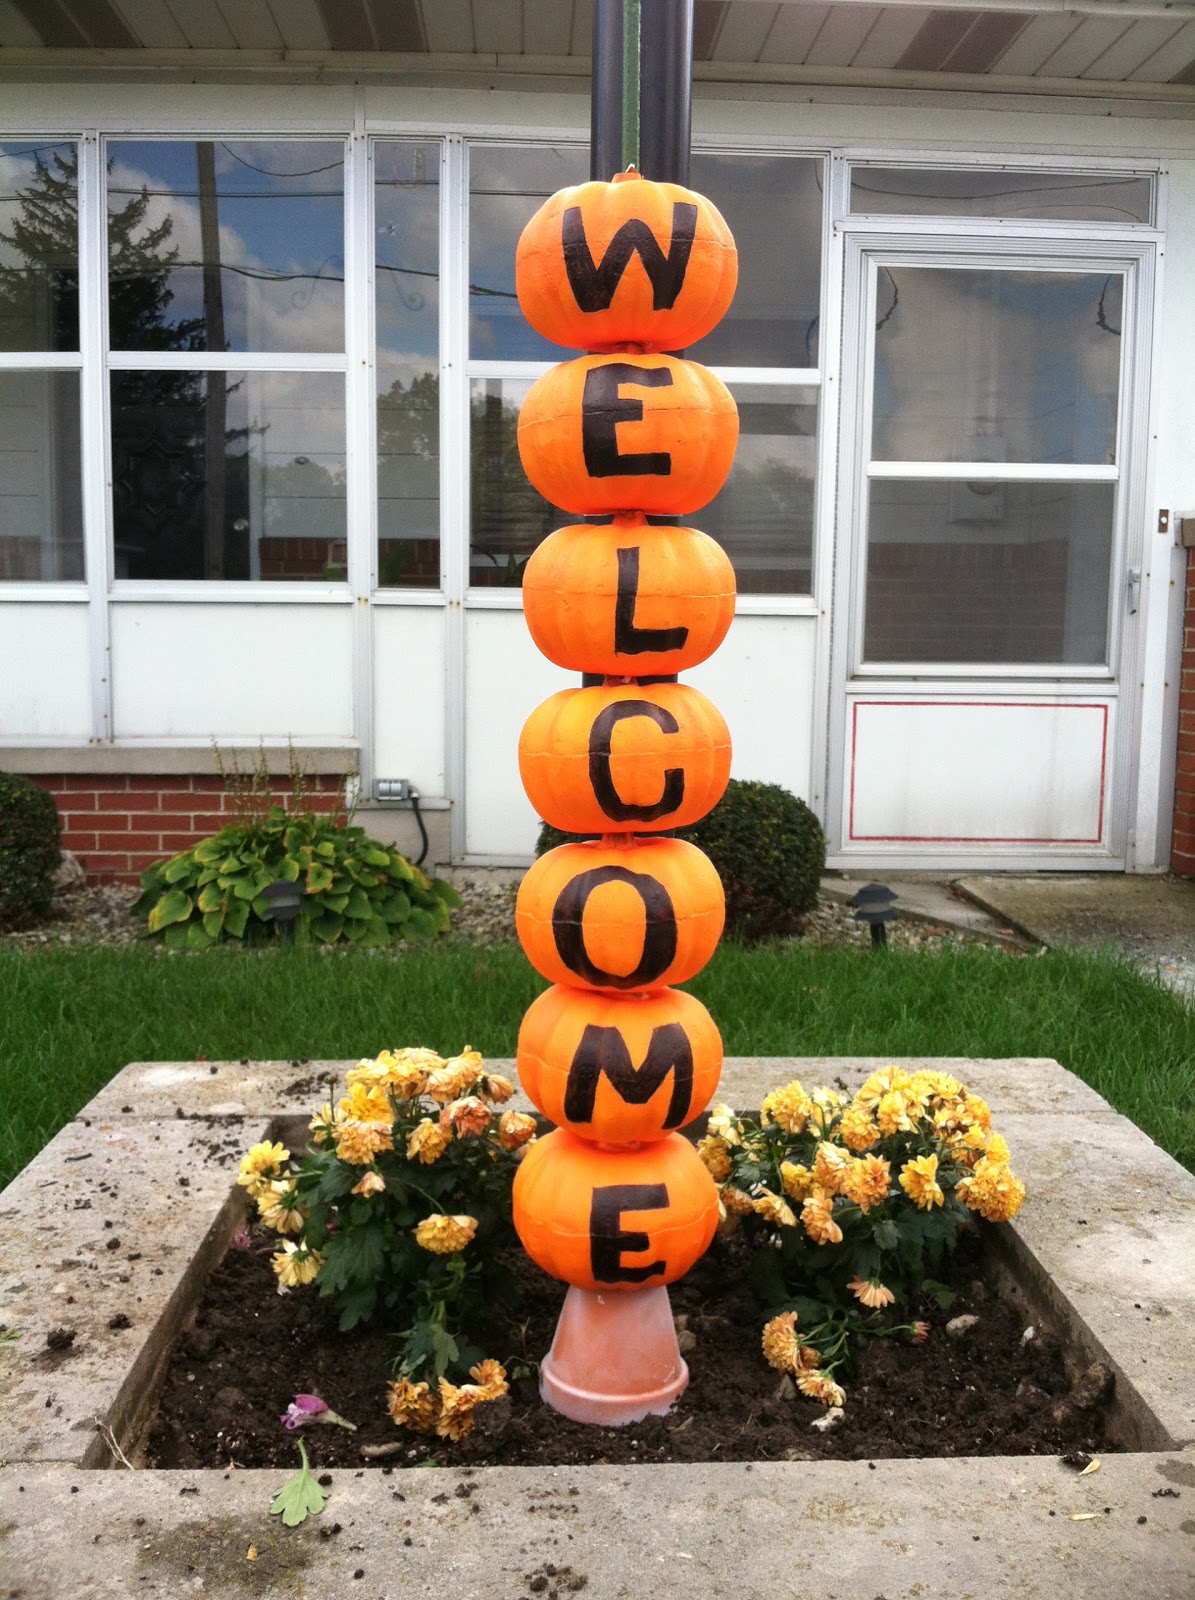
Dollar Store Craft - Welcome Sign Pumpkins!!

This post combines two of my favorite things - Fall & Dollar Store!!  


Supplies
Dollar Tree Pumpkins (as many as you need - $1 each).
Re-bar or some kind of stake long enough for your pumpkins
Permanent Marker (Dollar Tree $1)
Peering Knife (Dollar Tree)
Optional: Pot to keep pumpkins off the ground & fishing line to tie the bar back.


I cut a 3/4" inch hole in both the top and bottom.  Since these are hollow & foam it was messy but simple.


I outlined each letter with a pencil until I got it exactly like I wanted (drawing on an uneven surface can be tricky to get the letter to look even on both sides).  We did WELCOME, possibilities are endless - your last name, house number or a spooky Halloween theme!


I put down a pot first since my flower bed isn't level (I'm hoping it will keep my pumpkins clean too).


Melody had a GREAT time helping with the craft!!  She couldn't wait to put the pumpkins on the stake and it was fun to have her spell 'welcome' backwards ;-)


My finished product!
I added the Mums later - hopefully they'll brighten back up and make for a fun Fall Decoration!  

For another fun Fall Dollar Store craft involving pumpkins - check our Friend Morena's Blog Post!  She also has LOADS of other GREAT Dollar Store Crafts and great Halloween Crafts you and your kids will love!!

Monday, June 18, 2012

Embroidery Hoop Art & Earring Holder

Happy Monday, everyone!! 
Are you ready for a very FUN sister-see-sister-do post!? 
I've been on the GO so much lately that I haven't had very many chances to put together/post what I've been doing. So here goes...
I want to show you a fun way to turn scrap fabric (or an old item of clothing) AND your jewelry into ART!

I'm sure you've seen the way so many people are using embroidery hoops to decorate. I think it's such a fabulous way to make walls look more interesting! 
I created a little twist on some of mine so I could hang my earrings on them too! 


On some, I simply stuck a piece of twine in with my fabric & adjusted the tension. That's it!
 And the sweater hoop didn't need any twine, the earrings go right through the knit with ease...but believe me it's handy!!

1st I placed the hoop on an old sweater of mine. I have always loved the color & pattern of this sweater but it's always looke bulky on me & the neck was starting to bleach out. Once I  figured out where I wanted to cut, I went for it!
 Then I cut about 1" outside of the hoop.
 Then I placed my circle inside the hoop & adjusted the tension.
 Then I glued my leftover edges to the inside of the hoop.


After doing this project, this is how I decided to use/display my hoops. Some are in my bedroom where I use them to hang my earrings next to my other jewelry...and I made MORE decorative hoops with scraps of fabric, burlap, more of the old sweater, and a vintage pillow case - and I hung in the hallway for decoration!


Hope you've enjoyed this post! Keep your eye out at garage sales for CHEAP hoops! I got a large bag FULL of hoops for a DIME!!!!!! There's plenty left & I'm brainstorming some new ideas :) 


Happy Crafting!!!
Julie

See where I'm linking up on our party page :)

Monday, June 4, 2012

Fabric Art for under $10.00

Did you go vote yet in the One Artsy Mama Contest?  Go check it out and vote for your favorites.  We just love to see what the remaining contestants are coming up with!


Even though we're not in the contest anymore I'm still busy working on my own crafts around the house.  I have one room in the house I love to re-decorate about once a year.  I've finally neutralized the wall color so updating is as easy as whipping up pillow slip covers, spray painting some decor and in this case adding a bit of fabric!


We had purchased 2 pieces of wall art at Kohls about 5 years about (for about 3.00 a piece - I love a bargain). A couple weeks ago I was cleaning house prepping for our garage sale and decided the art needed to go... Then I changed my mind (after I had priced it and displayed it in the garage).  I really thought I'd paint over them since they were already textured it could have been a hit or miss...


I ended up at Wal-mart of all places and fell in love with this black and white fabric in the special occasion row.  I love it!  Its a bit shimmery and the black is velvet and raised up.  For $5.97 a yard I could not resist (they had 3 different patterns but this one matched my Goodwill Mirror).  I did add a piece of poster board .30 each between the art and the fabric so the previous art color would not show through.


Covering painters canvas or old art is easy peasy when its a wood frame!  Stretch from all directions and pull tight then staple!  It's SO inexpensive and easy to do, plus if you get tired of it changing it is no big deal!  When we were first married (several years ago...)I bought a couch size canvas and stretched over fabric.  It's a great option on a budget and for non-painters!

Now I just need to whip up a couple pillow covers to match!  I'm even thinking about covering some frames with some Modge Podge and fabric to match - go check this out for some inspiration at My Simple Obsession!

Thursday, May 24, 2012

Table Makeover

I love love love a easy makeover project.  This one my Sister delivered to my door (gearing up for a May garage sale).  I snagged it up and gave it some special treatment in the form of a purple coat of paint.


Check out the before - someone had tried to do a makeover but missed a few spots and the color just didn't work for me.  It had definitely potential just needed a little TLC.


Even though this already had a coat of paint I still like to prime just to be sure I get a solid piece that isn't going to peel and chip.  One coat of primer then two coats of paint and one coat of clear coat.  I used Valspar Paint for the purple (on a happy note it smells like grapes - scented spray paint love it!).


I love the way it turned out!!  Would make a great plant stand, side table or hall table.  If I had been thinking ahead I could have really used a small table in the hall...  As much as I love purple it doesn't really fit with our current decor.  If it fits with yours check it out For Sale at ReHab Fab in Van Wert.

Thursday, May 17, 2012

Antique Mirror from a Picture Frame

Have you ever been to a Flea Market or Antique Store and checked out the beautiful antique mirrors?  They show wear and tear and have that great peeling effect inside the glass?  Well, it's so EASY to get that same look at home!!


Here is what you need:

Picture Frame

Krylon Looking Glass Spray Paint (Walmart, Hobby Lobby, Amazon.com carry this)
Krylon Black Spray Paint
Spray Bottle
Bleach
Paper Towels

I wish I would have taken step by step photo's but I was so excited to try this out I forgot...  I removed the everything from the frame (glass, cardboard, backing).  I decided to paint and distress my frame to a pretty barn red.

CAUTION: make sure your glass is clean and free of any smudge or finger print - it WILL show up!!  

I laid my glass on a tarp and did 5 very thin coats of Looking Glass with 1 min in between each coat for the mirror.  Now if you like the look you achieved already you can stop here before applying the bleach.  Looking Glass does NOT give you a perfect mirror image, but it is perfect for the Antique look.


After the paint dried completely (I waited about an hour because I was impatient...).  I poured a little bleach into my spray bottle and randomly sprayed bleach all over the painted side of the glass.  I let this set for about 5 minutes and then gently blotted with a paper towel.  If you rub it will pull off more paint.  Wait for the bleach to dry completely (for this I left it sit outside overnight).


Finally paint side up I used Krylon Black Gloss Spray Paint to give the already painted side 2 thin coats of black paint (otherwise you could leave as is and just see the cardboard through the glass).

Put the glass back into the frame and enjoy!!!

I also used the Looking Glass Spray paint through lace to achieve this look below:

You can check out this tutorial HERE.
~M~

Wednesday, May 9, 2012

Dollar Store Craft: Hot Pad Hand Towel Tutorial

How about a low cost, highly useful, simple Mom's Day gift idea?  
A no slip hand towel for your oven door handle.  Best part is you can get everything you need at the Dollar Store - Total Cost $1.50!!  Plus its personal - pick the color and theme to match the receiver!


Here is what you need:
1 - Hot Pad

1 - Hand Towel
1 - Button
Needle/Thread/Sewing Machine/Straight pins

Step 1 - find the center of the hot pad (on the side you don't want to see) fold hot pad in half (I like to stick straight pins in along the crease and/or make a pencil mark so my seam will be straight.


Step 2 - Pin the Center fold of the towel to the center fold of the hot pad.

Step 3 - Sew a straight line right along your pinned/penciled line.

Step 4 - Sew your button to the side of the hot pad without the loop (the loop will act as your button hole).


Step 5 - Step back and check out your handy work!


It's SEW easy!! 

Cost - supplies purchased at Dollar Tree
$1.00 Towel
$1.00 2 pack of hot pads
Had thread, button, pins and sewing machine.

I love these things, never have to worry about my towel coming unfolded or slipping off my oven door handle.   This one was inspired by my MOM - Happy Mothers Day!!

Wednesday, May 2, 2012

Picture Frame Dry Erase Board with Lace

Last Fall that I introduced you to my Homemade Dry Erase Board from an old picture frame.  Since then I've taken those simple Marker Boards all different directions.  My first attempts were successful using fabric, scrapbook paper or black and white pics as the backgrounds.

This one is a new take on Fabric and Paint!!


Check out my latest DIY Marker Board.  To reproduce this look you'll need:


1 old or new picture frame
1 can spray paint
Lace fabric (enough to cover your glass from the frame plus about an inch over hang on each side)
Painters Tape
Velcro spots
Dry Erase Marker


It's up to you if you want to paint your frame or leave it as it - personally I like to paint my frames and sometimes distress it (see above purple frame).  You'll want to remove the backing, current picture and glass before painting the frame.  


Make sure your glass is clean and free of your finger prints before starting this step.  Tape your lace to your glass - pulling snug otherwise you could end up with extra paint where the lace was loose.  I just love using lace as a stencil! 


Flip the glass over so the tape side is down.  Now you are ready to spray!  Remember to shake the can VERY well.  Use light even strokes going slightly past the edge of your project to get a clean even coating.  For these frames I did 3 coats of paint waiting about 1 min in between each coat (and shaking well between coats).  I let mine dry about 5 min before carefully removing ALL the painters tape and then peeling back the lace.


Once your paint is completely dry (about an hour but I prefer overnight).  Place the glass back in the frame with the unpainted side pointing outward - you want to be able to mark on the smooth side.  


For the white inside I used a piece of white wrapping paper - you could also use printer paper or a poster board cut to size.  Add your rough Velcro dot to the side of the frame and the soft Velcro side to your marker and stick.

You've got a super cute DIY Marker Board that could also be used as a piece of wall art!  If you're not in the DIY mood check out ReHab Fab in Van Wert where all of the above pieces are for sale.


~M~

Monday, April 30, 2012

The Pretty Pink Posie

Taking a Look Back

The Pretty Pink Posie

This flower is definately my FAVORITE!
I'm quite partial to pink anyway, but I truly love the texture & petals in this flower.
Putting it together was SO simple too. I've seen several tutorials out there for flowers similar to the ones I made.   I took what I'd seen & experimented for a while, & figured it out!
This flower did not require any sewing, but did require burning my fingers on hot glue a few times.


 I'm pretty sure the color of grass in the spring is my all time favorite color...especially next to pink!


After making the smaller three that you see above, I became ambitious & decided to make a bigger version of the same flower.
Oh gooood golly miss molly! I'm going to wear this one A LOT!


Well...what do you think?


I'm partying here today...


Tip Junkie handmade projects

Sumo Sweet StuffThe Girl Creative
Makingcraft

Printer Friendly View

Related Posts Plugin for WordPress, Blogger...